How to Screen Record on iPhone 11, 12 &13 with Sound
Making a walkthrough or showing off your mobile gaming prowess is also an acceptable option. Only a few taps are all that are needed.
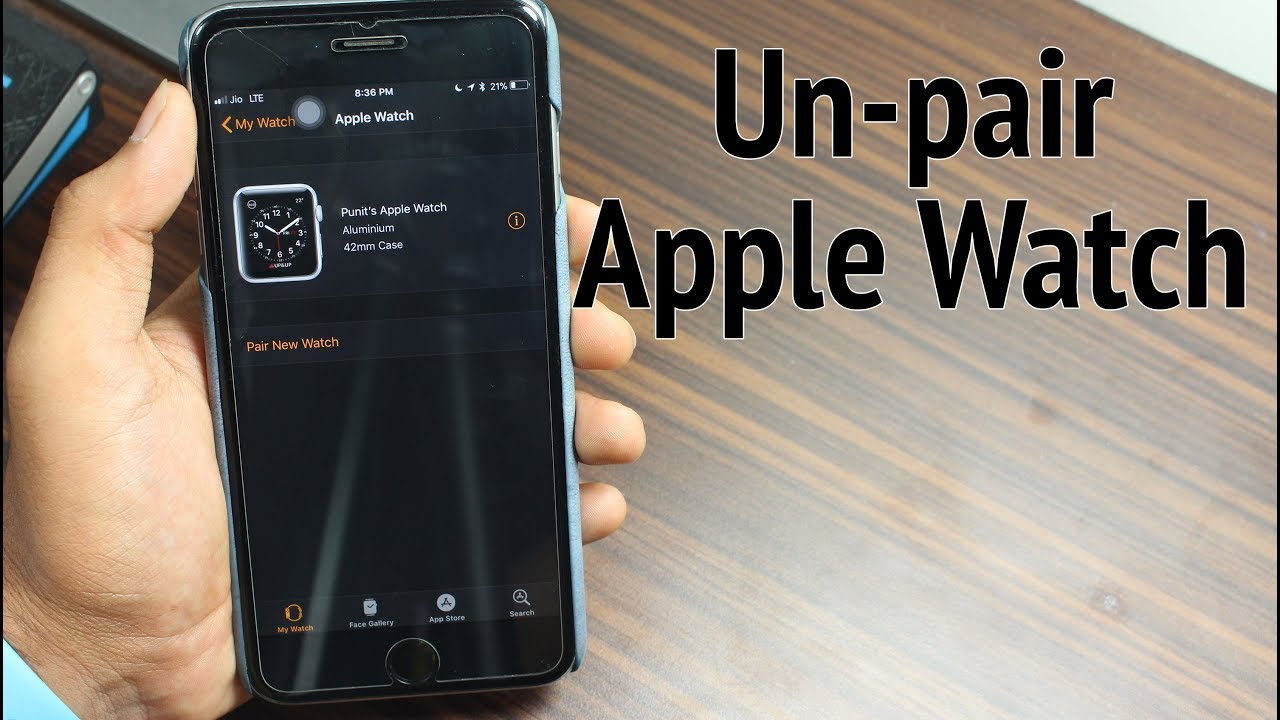
During the time your parents are using their new iPhone, do they frequently ask you how to record a screenshot? Do you know how to record your screen? Make a video of your epic Fortnite victory and share it with the world! When you upgrade to iOS 11, you can record the screen of your iPhone, iPad, or iPod touch. Procedures that used to require a third-party programme are now very simple. If you have an iPhone, you don’t need to utilize any other screen-recording programme. Find out everything you need to know about shooting a video on your iPhone screen right now!
Even if you’re trying to lead a loved one through the process of setting up a new phone, you can easily screen record iPad or iPhone to chronicle the process as it progresses toward its satisfying conclusion in Apple Arcade.
Of course, you can still use your screen record on iPad to capture screenshots and annotate, draw, and record, but there are instances when an audio recording is a superior option. The only prerequisite is that you have iOS 11 or a later version installed on your iPhone, iPad, or iPod Touch.
[Also read: 6 Best Screen Protectors in 2022]
How to screen record on iPhone and set up iPhone screen recording

Even though iPhone screen recording is simple, you must first enable it in the Control Center in order to use it.
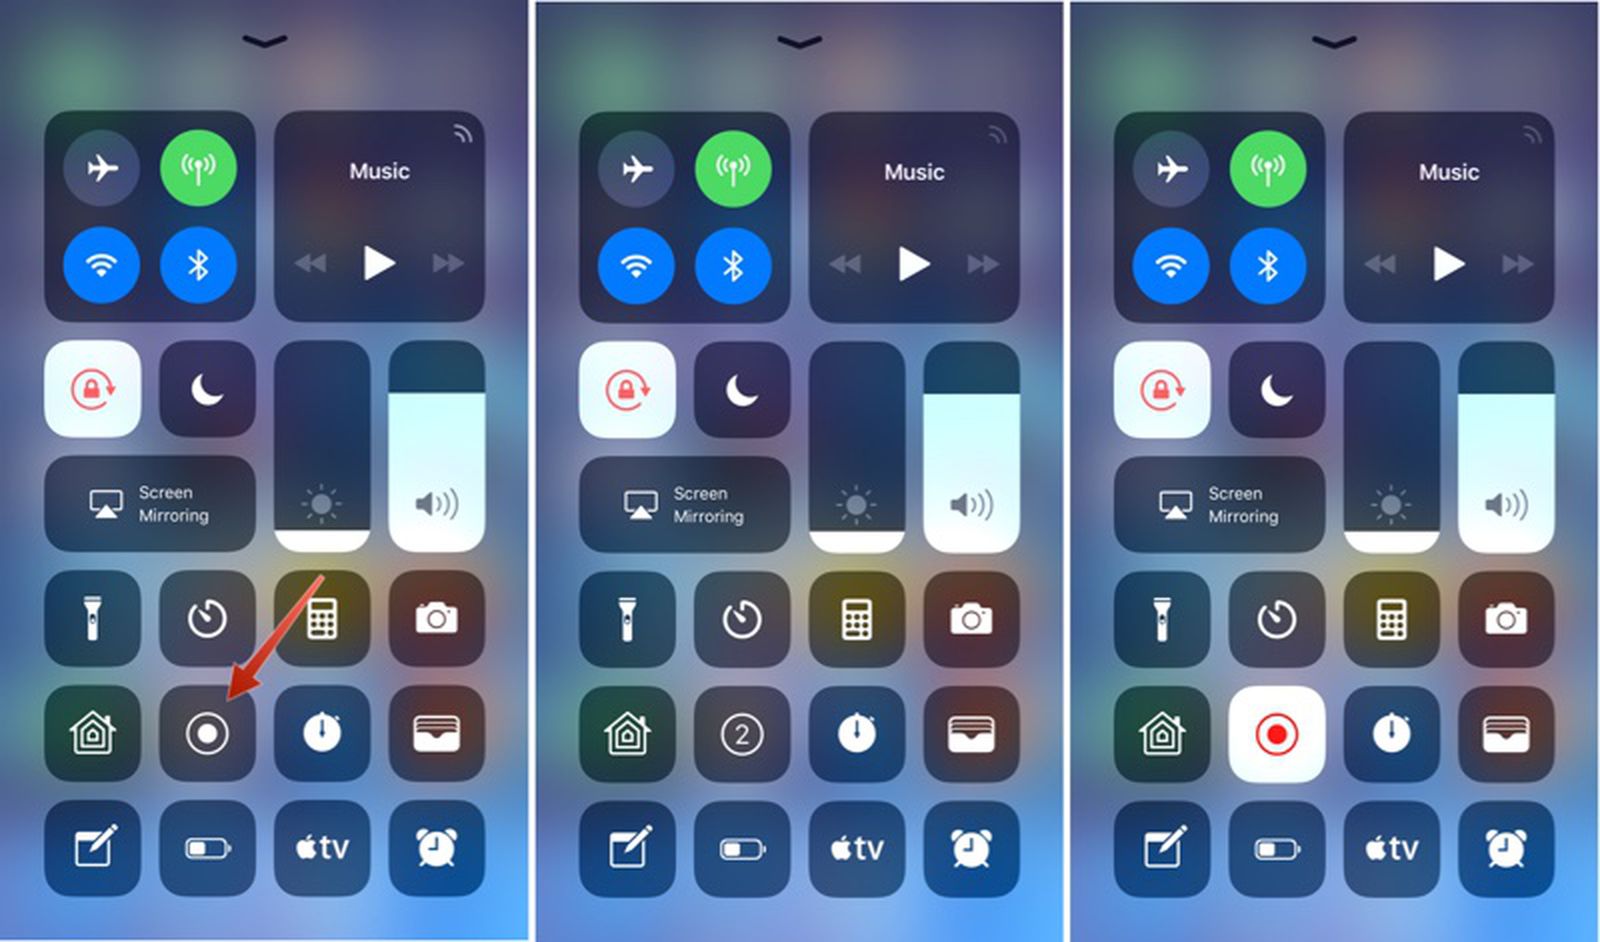
Step 1: Before you can begin using the online screen recorder iPhone tool, you’ll first need to add the feature’s button to the Control Center. On your iOS device go to Settings > Control Center > Customize Controls then tap the green plus button next to iPhone Screen Recording.
Step 2: Next to iPhone Screen Recording, choose the add (+) symbol.
Step 3: On an iPhone X or an iPhone 11, swipe down from the top right side to reveal the Control Center. From there, you can tap Screen Record iPhone 11 to begin recording your screen.
Recording screen iPhone – Apple has simplified the process of iPhone screen recording considerably.
After adding the shortcut, you begin by opening the Control Center. On iPhones older than the iPhone X ($262 at Amazon), get there by swiping up from the bottom of the screen. On newer iPhones, swipe down from the top-right corner of the screen.
Tap on the iPhone Screen Recording button, which will prompt a countdown inside the button followed by it turning red to indicate to begin capturing whatever’s on your display.
You’ll know when your screen is being recorded because there will either be a red bar across the top of your screen (on older iPhones) or the time will have a red highlight behind it (on newer iPhones). Tap on the red button or bar to stop recording.
With a long-press, you can opt to turn on audio recording so you can narrate your video.
Check out the detailed steps below
Step 1: The first step is to open the Control Center and touch on the iPhone Screen Recording icon. A white circle is encircled by a circular ring.
Step 2: Your phone will begin recording three seconds after you touch it and give you three seconds to shut the Control Center. You’ll see a red bar at the top of your screen while you’re recording.
Step 3: Things become a bit more complicated if you want to include audio in your screen captures. For further possibilities, use 3D Touch to tap the Screen Record iPhone Screen icon. In the center of your screen, a pop-up menu will appear.
Step 4: To begin recording, click on the Microphone Audio icon and then the Start Recording button.
Step 5: It’s the quickest method to end a recording by tapping on the red timer on top of the screen. Upon tapping on the message iPhone Screen Recording Video saved to Photos, you’ll be sent to the Photos app where you may view your video. Alternatively, you may access the Control Center by tapping on the Screen Record on iPhone icon.
[Also read: Difference between Compiler vs Interpreter]
Using a computer to edit a video that has been recorded

Recordings are saved to the phone’s internal memory as soon as you complete recording a screen. iPhone record screen videos are stored on the camera roll and displayed in the notification bar.
Step 1: Start by tapping on the video notification to display it. It is possible to edit the recording in the Photos app, too.
Step 2: You can edit an iPhone screen recording in the same way you edit any other video using the Photos app. To edit a video, go to Photos, choose the video, and then select Edit.
Step 3: This is the final and most important step of the procedure, in many ways. Toggle bars at each end of the slider allow you to make separate adjustments to each frame.
Step 4: Toggle the bars to the desired location to make changes to your iPhone screen recording.
Step 5: You can stop editing at this point by clicking the Done button on your toolbar.
Step 6: After each process, make sure you have saved your work for future reference. Before shutting down the editing window, use the File menu option Save as New Clip.
The use of audio can enhance a recording.
What if you need to show someone how to use a feature or workaround a bug? As long as you have a screen recording going, you can use your phone’s microphone to record for as long as you want.
Open the Control Center and push the iPhone Screen Recording button for a few seconds to activate it. A new menu will appear, and at the bottom is a toggle to switch on your microphone. Once the Microphone Audio button has turned red, select Start Recording to begin recording audio from the microphone.
When your screen is being recorded, the iPhone Screen Recording button turns red.
Okay, I recorded it… What’s next?
The screen recorder app will ask you if you want to save the video to the Photos app when you stop recording. View, edit, crop, and send the video over Messages, email, or your preferred social network in the Photos app.
A few years back, iOS 11 introduced the option to record the iPhone screen, but iOS 15 added much more features. To make your FaceTime video look its best, we’ll teach you how. Check out Apple’s instructions on how to receive a temporary email account from them.